For Those About To Cook

  • Home
  • About Us
  • All Recipes
  • Subscribe
menu icon
go to homepage
  • Home
  • About Us
  • All Recipes
  • Subscribe
    • Facebook
    • Instagram
    • Pinterest
  • search icon
    Homepage link
    • Home
    • About Us
    • All Recipes
    • Subscribe
    • Facebook
    • Instagram
    • Pinterest
  • ×
    Home

    Broccoli Salad

    August 10, 2020 By Caroline

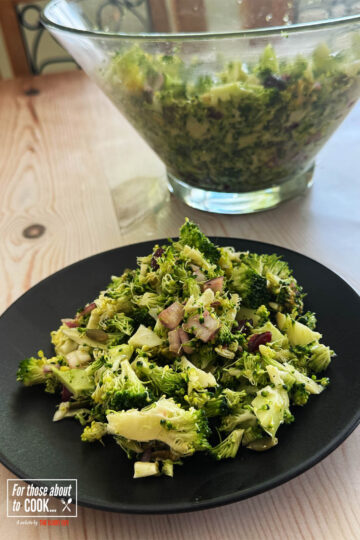
    Broccoli Salad on a serving plate.

    I’ll admit it... when I first heard “raw broccoli salad,” I wasn’t exactly running to the kitchen. Broccoli? Raw? Really? But trust me on this one: Italian raw broccoli salad is something special.

    This isn’t your average soggy green side dish. No limp vegetables here. This salad is fresh, zesty, crunchy, and bursting with Mediterranean flavour—just the kind of dish I love making alongside grilled meats, pasta, or even as a light lunch on its own. It’s the sort of thing that surprises people in the best way. They take a bite, eyebrows go up, and suddenly everyone’s asking for the recipe.

    I'm not exaggerating there! It's true. Everyone I have served this broccoli salad to loves it and begs for the recipe and now I'm going to share it with you.

    Broccoli Salad on a serving plate.

    About this broccoli salad recipe.

    This is a recipe my mother-in-law served one day that had been lost in our her family cookbook for years before she decided to give it a try. I did change it some but it is essentially what Dan's great grandparents from Italy used to make.

    If you're a fan of dishes that come together quickly, taste fantastic, and make you feel like you're eating sunshine on a plate, then this one’s for you. Even Dan loves it and that's saying something.

    [feast_advanced_jump_to]

    What Makes This Broccoli Salad So Good?

    The secret to this dish is simple: slice the broccoli into small pieces and dress it like you would a bold Italian antipasto—good olive oil, garlic, chilli flakes, lemon juice, maybe a splash of vinegar, and plenty of salt.

    For sweetness, I add dried cranberries but that wasn't in the the original recipe. I do think they adding them turns this raw broccoli salad into something worthy of taking centre stage though.

    Think of this like an Italian-style slaw. But instead of cabbage, you’re using broccoli—and instead of mayo, you’ve got olive oil, garlic, and lemon doing the heavy lifting.

    This broccoli salad is like a party in your mouth. I promise!

    Ingredients

    There aren't a lot of ingredients in this version of the salad. I do give additional variations below if you want to give them a try. If the ingredient sounds good, add it.

    Ingredients for the recipe.
    • Broccoli Florets
    • Pumpkin seeds
    • Red Onion, finely sliced
    • Dried Cranberries
    • Extra Virgin Olive Oil
    • Cider Vinegar and/or lemon juice
    • Honey
    • Dijon Mustard
    • Parmesan (optional)
    • Garlic
    • Salt and pepper to taste

    See recipe card for quantities.

    Instructions

    Check out these step by step instructions to see just how easy and quickly you can throw this masterpiece of a salad together.

    Pouring all the chopped vegetables into a salad bowl.
    1. Step 1: Pour all of the ingredients except the dressing into a large salad bowl.
    Pouring in the olive oil and mixing it in.
    1. Step 2: Pour in the olive oil and toss so that it coats it all nicely. For best results, use a good quality Extra Virgin Olive Oil.
    Adding the remaining dressing ingredients.
    1. Step 3: Add the remaining dressing ingredients and toss well to combine. Taste it and adjust the flavours. Season with salt and pepper to taste. This is a good time to have a play and add any of the other ingredients I recommend below if you want to.
    Serving the broccoli salad.
    1. Step 4: If time permits, let the broccoli salad rest in the fridge for 30 minutes before serving. Then give it another good toss and serve.

    Why This Salad Works

    This dish proves that raw veg doesn’t have to be boring. The key is balance: acid from the lemon and vinegar, heat from the chili, richness from the olive oil and cheese, and crunch from the broccoli and nuts. Every bite delivers contrast, and that’s what makes it irresistible.

    It’s the kind of salad that doesn’t just sit on the side of the plate—you’ll be going back for seconds. And thirds.

    Tips, Tricks & Twists

    Don’t skimp on the oil: This isn’t the time to go light on the olive oil. Use the good stuff—it makes a big difference.

    Add protein: Want to make this a full meal? Add in some grilled chicken, white beans, chickpeas, or even tuna. It soaks up the dressing beautifully.

    Cheese options: Parmesan is classic, but aged pecorino or even shaved asiago work just as well. If you’re dairy-free, try nutritional yeast for a cheesy flavour without the cheese.

    Make it ahead: This salad actually improves as it sits. You can prep it a few hours ahead of time—just leave out the nuts and cheese until just before serving to keep things crisp.

    Make it extra colourful: Add in thinly sliced red cabbage, carrots, or radishes for extra crunch and colour. It’s a great fridge-clean-out dish.

    Serving Suggestions

    This salad plays beautifully with all kinds of dishes. Here are a few favourites:

    Topped on toast – Yes, seriously. Try it piled onto a slice of sourdough with a soft-boiled egg.

    Grilled meats or fish – The acidity cuts through rich proteins like a charm.

    Pasta night – Serve alongside spaghetti aglio e olio or a creamy fettuccine.

    Picnic or BBQ – It travels well and holds up without wilting like lettuce-based salads.

    Storage

    You can store the salad in an airtight container in the fridge for up to 3 days but there are a few things to consider:

    Best quality: It’s at its freshest and crunchiest within the first 24 hours, but the flavour actually deepens after a few hours as the broccoli absorbs the dressing.

    What to add later: If you’re making it ahead, hold off on adding nuts, cheese, or fresh herbs until just before serving. This keeps them from going soft or soggy.

    To serve after storage, just give the broccoli salad a toss before serving and maybe a little extra squeeze of lemon or olive oil to freshen it up.

    Final Thoughts

    If you’ve never tried broccoli raw, this salad is the perfect introduction. It’s bold, Italian-style cooking at its most refreshing—simple ingredients used in smart ways to bring out the best in each other.

    I’ve served this to broccoli sceptics who’ve gone back for thirds. It’s one of those dishes that surprises people and makes them rethink what vegetables can do. And that’s what I love about cooking—taking something ordinary and turning it into something unforgettable with just a few simple tweaks.

    So give it a try. Chop it thin, dress it boldly, and don’t forget the cheese. You’ll never look at broccoli the same way again.

    Top Tip

    If any of the above variations sound good to you, try the simple recipe below first. Have them on hand to add to it if you like.

    FAQ

    Do you really have to use raw broccoli? Can you blanch it first?

    ou can blanch it, but it’s not necessary. The beauty of this salad is the crunch and freshness of raw broccoli. That said, if you’re not a fan of raw veg, blanch the florets in boiling water for just 30–60 seconds, then plunge them into ice water to keep their colour and crispness. It’s a great way to soften the texture slightly without losing the bite.

    How do you keep raw broccoli from being too tough or bitter?

    The trick is to slice it into small pieces. This makes it easier to chew and helps it soak up the dressing. Letting the salad sit for 15–30 minutes before serving also helps mellow any bitterness and slightly tenderises the broccoli.

    Can you use store-bought broccoli slaw instead of fresh broccoli?

    Yes, that’s a great shortcut! Pre-shredded broccoli slaw works well and saves time. Just make sure it’s fresh and not too dry.

    What other veggies can you add to this salad?

    Tons! Try thinly sliced red cabbage, carrots, fennel, radishes, or even shaved Brussels sprouts. Anything crunchy that plays well with a tangy vinaigrette will work beautifully and add colour and texture.

    Related

    This broccoli salad makes an excellent side dish for all of these...

    • tomato and mascarpone pasta
      Tomato and Mascarpone Pasta
    • Ribeye steak with garlic butter served with loaded potato and broccoli
      Ribeye Steaks
    • The cooked fish on a serving platter drizzled with the herb mixture.
      Mediterranean Fish - Grilled
    • gnocchi with brown butter and sage
      Gnocchi With Brown Butter And Sage
    • Bowl of chicken and chorizo risotto garnished with parsley
      Chicken and Chorizo Risotto
    • Homemade easy pesto pasta
      Easy Pesto Pasta
    • Finished asparagus risotto
      Asparagus Risotto
    • cassoulet on a serving plate with crusty French bread and salad.
      Cassoulet
    • Homemade Tuscan chicken plated up
      Tuscan Chicken
    • All Italian burger finished
      The All Italian Burger
    • 40 clove garlic chicken in the bowl it was cooked in.
      40 Clove Garlic Chicken Recipe
    • Spooning the chicken and asparagus onto a plate.
      Chicken and Asparagus

    Recipe

    Broccoli Salad on a serving plate.

    The Best Broccoli Salad Recipe

    Yield: 4
    Prep Time: 15 minutes
    Total Time: 15 minutes

    This is my simple and delicious raw broccoli salad recipe. Try it as written and you will not be disappointed. You can do so much to it though. Check out the other possible additions above.

    Ingredients

    • 500 g ( 1 Ib ) Broccoli Florets, chopped into small pieces
    • 100 g ( ½ Cup ) Pumpkin seeds
    • 100 g ( ½ Cup ) Red Onion, finely sliced
    • 75 g ( ⅓ Cup ) Dried Cranberries
    • FOR THE DRESSING
    • 80 ml ( ⅓ Cup ) Extra Virgin Olive Oil
    • 2 tablespoon Cider Vinegar
    • 1 tablespoon Honey
    • 1 tablespoon Dijon Mustard
    • 3 tablespoon grated Parmesan (optional)
    • 2 Cloves Garlic, finely chopped
    • Salt and pepper to taste

    Instructions

    1. Mix all of the salad ingredients in a large bowl.
    2. Combine all of the dressing ingredients together and whisk well. I usually add the olive oil first and stir it in and then add the remaining ingredients, slowly and to taste.
    3. Mix the dressing into the salad ingredients in the large bowl.
    4. Taste it and adjust the flavours as necessary.
    Nutrition Information:
    Yield: 6 Serving Size: 1
    Amount Per Serving: Calories: 350Total Fat: 188gSaturated Fat: 26gTrans Fat: 0gUnsaturated Fat: 155gCholesterol: 3mgSodium: 286mgCarbohydrates: 328gFiber: 72gSugar: 136gProtein: 29g
    © Dan
    Cuisine: Italian / Category: Italian

    Garlic Dip - Indian Garlic Chutney

    August 10, 2020 By Dan

    Finished Garlic Dip

    This garlic dip is one for garlic lovers. With 40 cloves of garlic it is not for the faint hearted!

    I use dried red Kashmiri chillies and leave the seeds in the chillies but feel free to remove the seeds if you like a less hot chutney.

    The garlic chutney takes on the color of the vibrant Kashmiri chillies giving a beautiful color to brighten any dish.

    Finished Garlic Dip
    The completed dish!

    40 Cloves of garlic and chillies
    Lightly crush the garlic

    frying garlic and chillies
    Fry the garlic and chillies

    Blending the ingredients
    Blend the garlic, chillies and tamarind.

    Once you have blended the garlic and chillies you have a nice red garlic dip but adding the fried mustard seeds with the curry leaves at the end just finishes the dip off perfectly and you will find that this combination brings out all of the flavors wonderfully.

    I serve this 40 clove garlic chutney with dosas and idlis but it also is a great dip to serve with poppadoms. As this is a very spicy dip I would suggest serving it with maybe a yogurt raita to give a variation in flavors and spices. The raita would definitely work well with all the spices in my 40 clove garlic dip.

    If you love this recipe why not give my other similar ones a go:

    Keema Dosa Recipe
    Fiery Hot Chilli Olive Oil
    Achiote Paste Recipe

    Recipe

    Finished Garlic Dip

    Garlic Dip - Indian Garlic Chutney

    Yield: 6
    Prep Time: 10 minutes
    Cook Time: 50 minutes
    Total Time: 1 hour

    Ingredients

    • 4 tablespoon Rapessed ( Canola Oil )
    • 40 Garlic Cloves, lightky crushed
    • 10 Dried Kashmiri Chillies
    • 1 teaspoon Tamarind Concentrate
    • 1 teaspoon Black Mustard Seeds
    • 10 Fresh or Frozen Curry Leaves

    Instructions

    1. Heat the oil in a frying pan over medium heat
    2. Add the garlic cloves and chillies and fry until the garlic is soft and lightly browned
    3. Blend the garlic, chillies and tamarind concentrate with just enough water to form a thick paste. Stir in salt to taste.
    4. Heat up the remaining oil in a frying pan over medium heat. Add the mustard seeds and fry until they begin to pop. Then add the curry leaves and fry gently for another 30 seconds.
    5. Pour this oil over the garlic dip and it can be eaten hot or cold.


    Corn Chips

    August 5, 2020 By Dan

    Fnished corn chips

    I could not possibly feature Mexican food on my site without a recipe for simple but delicious fried corn chips.

    Yes, they aren't low calorie but served with a tasty tomato or avacado salsa at least they can provide some nutrition!

    Fnished corn chips
    The finished corn chips

    Cutting the raw tortillas
    Cut the raw tortillas into triangles.

    Cooking the tortillas in the fat
    Fry the raw tortillas in plenty of oil.

    Fresh out the fryer
    Place the fried tortillas on kitchen roll to remove excess fat.

    Fnished corn chips
    The finished chips with salsa!

    The difference between these home made chips and the store bought chips in a bag is like comparing two different planets! I would always advise making our own corn tortilla chips if at all possible as once you taste them you will know it is definitely worth it.

    I have a deep fat fryer but they can also be fried in a deep frying pan as that works just as well.

    Serve the chips in a huge bowl surrounded by a few of your favorite salsas and you will find yourself never buying chips in a bag again!

    They can also be made ahead of time as they will keep for a few hours and remain crisp until your guests arrive.

    You can also store them in an air tight plastic bag for up to a week.

    I recommend serving my home made corn chips with any or all of these salsas:

    Tomatillo Salsa
    Easy Salsa Recipe
    Guacamole
    Creamy Salsa

    Recipe

    Fnished corn chips

    Corn Chips

    Yield: 6
    Prep Time: 3 minutes
    Cook Time: 3 minutes
    Total Time: 6 minutes

    Ingredients

    • 15-20 Corn Tortillas
    • Rapesseed ( Canola ) Oil for frying
    • Salt crystals to sprinkle over the top

    Instructions

    1. Heat the oil to approximately 180 C ( 350 F )
    2. While the oil is heating cut the round tortillas into triangles
    3. Lower the tortilla triangles gently into the oil and cook for around 3 minutes
    4. Serve in a large bowl surrounded by your favorite salsas
    © Joe Toombs
    Cuisine: Mexican / Category: Mexican Recipes

    Massaman Curry Paste

    August 5, 2020 By Dan

    Massaman curry paste

    Making Thai Massaman curry paste is a good idea if you want the best Massaman curry. Sure you can purchase good pastes but nothing compares to homemade.

    Like most authentic Thai curries pastes, making Massaman curry paste is best made the traditional way, by pounding the ingredients into a paste in a pestle and mortar.

    This can be quite time consuming, up to an hour. If you want to cheat, you can still get fantastic results using a food processor.

    Massaman curry paste
    You will love the way your Massaman curry tastes! Try this homemade Massaman curry paste.

    How strong is this paste

    I use the whole batch in a curry to serve four people. There are so many nice ingredients in the paste and not all of them are spicy.

    If you use a commercial brand of Massaman curry paste, you won't get all those delicious ingredients in it.

    Usually shop bought Massaman curry paste is quite salty and spicy. You will want to use a lot less of it in your curry and you won't get all those amazing flavours.

    Garlic ready to pound in pestle and mortar
    It is a good idea to pound each ingredient separately. Get one pounded to a paste and then add another.

    Adding lemon grass to pestle and mortar
    Get the tough lemongrass out of the way early.

    Adding shallots to pestle and mortar
    Shallots are quite easy to pound to a paste.

    Adding galangal to paste
    Galangal can be a bit more difficult. Really get in there and break it down.

    Soaking chillies
    I soak my dried chillies to make it easier to pound them.

    Roasting whole spices for Massaman curry paste.
    Roasting the whole spices for the Massaman curry paste.

    Pounding chillies
    Pound those chillies hard. You really want to break them up.

    Adding ground spices
    You can add the ground spices whenever they're ready.

    Stirring in shrimp paste
    To finish, add the shrimp paste.

    Massaman curry paste
    Ready for that curry!

    If you like this recipe, you might like to try some of these too.

    Thai red curry
    Thai green curry
    Thai pork belly stew
    Gai Yang - Thai grilled chicken

    Recipe

    Massaman Curry Paste

    Yield: 1 cup (250ml)
    Prep Time: 30 minutes
    Cook Time: 5 minutes
    Total Time: 35 minutes

    Ingredients

    • 1 tablespoon of coriander seeds
    • 1 ½ tablespoon of cumin seeds
    • 5 whole cloves
    • 1 tsb black peppercorns
    • 1 whole nutmeg
    • The seeds from 6 green cardamom pods
    • 1 - 5cm (2 inch) cinnamon stick
    • 12 large dried red chillis deseeded and soaked in warm water for 30 minutes
    • 2 - 3 small shallots finely sliced
    • 1 long stick of lemongrass white part only
    • 1 thumb-sized piece of galangal
    • 8 cloves garlic - smashed
    • Zest of ½ lime
    • 3 kaffir lime leaves
    • 2 teaspoon shrimp paste

    Instructions

    1. Heat a pan over medium high heat and toast the whole spices until warm to the touch and fragrant but not yet smoking. Transfer to a pestle and mortar to cool and then pound to a fine powder.
    2. Transfer the ground spices to a plate and then add all the aromatic spices to the pestle and mortar. Pound the spice for 15 to 20 minutes until it is broken down into a paste.
    3. Add the shrimp paste and ground spices and pound for another 5 minutes or so until you have a delicious, buttery curry paste.
    4. The paste will keep in the fridge for about three week or longer in an air-tight container.

    Authentic Beef Massaman Curry

    August 5, 2020 By Dan

    Beef Massaman curry

    Beef Massaman curry
    This beef Massaman curry recipe is very authentic. Give it a try!


    I love a good Thai beef Massaman curry. This recipe will get you authentic and delicious results.

    Massaman curries are different to most other Thai curries. Thai food has many influences from Chinese to Indian. 

    Beef Massaman curry definitely has Indian and Persian influences. Whole spices like cumin, coriander, cinnamon and black peppercorns are added to the Massaman curry paste.

    Although beef Massaman curry tastes very Thai, you will notice some of the other influences.

    <H2>Getting this recipe right</h2>

    It is essential that the potatoes and beef be cooked to perfection. No one likes beef that isn't tender or under-cooked potatoes. 

    This is why I suggest cooking these in water first until cooked through. By doing this you not only get deliciously tender meat and potatoes, the water becomes a mouthwatering stock that is added to the sauce. 

    <h2>Which Thai curry paste to use?</h2>

    I hope you try my homemade Massaman curry paste. This is an authentic recipe prepared the traditional way, by pounding the ingredients into a buttery paste. 

    Although pounding the ingredient for up to an hour is the traditional way of doing it, you can cheat a bit and use a food processor.

    Alternatively, purchase a good quality Massaman curry paste if you must. I use Mae Ploy 

    Thai green curry
    Thai green curry paste
    Thai red curry paste
    Thai grilled chicken - gai yang
    Khao soi - Thai chicken soup with noodles
    Coconut curry chicken

    Recipe

    Beef Massaman curry

    Authentic Beef Massaman Curry

    Yield: 4 - 6
    Prep Time: 10 minutes
    Cook Time: 2 hours
    Total Time: 2 hours 10 minutes

    Ingredients

    • 700g (1 ¾ lbs.) stewing beef
    • 500ml (2 cups) water plus more as required
    • 2 potatoes - peeled and cut into bit sized pieces
    • 2 tablespoon coconut oil
    • ½ red onion - roughly diced
    • 1 handful of roasted peanuts
    • 1 batch homemade Massaman curry paste or shop bought paste to taste.
    • 400ml (1 ½ cups) thick coconut milk
    • 1 - 2 tablespoon palm sugar
    • 3 tablespoon Thai fish sauce
    • 1 teaspoon tamarind concentrate
    • Salt to taste

    Instructions

    1. Place the beef in a saucepan and pour the water over it. Bring to a simmer and cook for 1 ½ to 2 hours until the meat is really tender. You will probably need to add more water but only add just enough to cover. We want the stock to be really flavourful from the beef.
    2. When the meat is almost tender enough to eat, stir in the potatoes and cook until fork tender.
    3. While the meat is cooking, you can start making the curry. In a wok or large frying pan, heat the coconut oil over medium high heat. When it begins to shimmer, add the onion and peanuts. Fry for about 3 minutes and then add the massaman curry paste. Stir well to combine in the oil.
    4. Now add the coconut milk and the tamarind concentrate, followed by the beef, potatoes and about 250ml (1 cup) of the cooking stock. Simmer for about 10 minutes to thicken.
    5. Season with salt to taste to serve.
    © Dan Toombs
    Cuisine: Thai
    I hope you enjoy this beef Massaman curry recipe. If you do try it, please leave a comment. I'd love to hear from you.

    Fried Fish Tacos

    August 4, 2020 By Dan

    Fried Fish Tacos

    Fried fish tacos are just dream food! This recipe for perfect Mexican fish tacos is very quick and easy and goes amazingly well with my creamy fish salsa and/or a tomato or tomatillo salsa if you want to be healthier.

    Fried fish tacos can be made with any chunky white fish. I love cod or haddock but fish like cat fish also works too so use whatever fish you can lay your hands on that isn't too expensive.

    Finished Fried Fish Tacos
    The finished result, delicious!

    I enjoy my fried fish tacos served on corn tortillas but flour corn tortillas are a great alternative if these are what you have to hand. Here in the UK, you can purchase freshly made corn tortillas from The Cool Chilli Company. 

    They're authentic and delicious.

    Make the recipe for fish tacos your own:

    If you like really spicy fried fish tacos think about maybe adding chilli powder along with the cayenne powder to the batter. 

    Also you may want to grate some cheese on the top of the tacos along with spooning the salsas on top.

    Fried fish tacos can be made any way you choose so feel free to add to  the top of the tacos your favorite Mexican ingredients.


    If you enjoy this recipe try these similar ones:

    Creamy Salsa for Fish
    Pork Carnitas Tacos

    Beating the batter
    Whisk the beer and flour.

    Dipping the fish in oil
    Dip the battered fish in the oil.

    The crisping fish
    Cook the battered fish in the oil.

    Fried Fish Tacos
    Serve with lettuce and salsas of your choice

    Recipe

    Fried Fish Tacos

    Fried Fish Tacos

    Yield: 4
    Prep Time: 10 minutes
    Cook Time: 5 minutes
    Total Time: 15 minutes

    Ingredients

    • 700 g ( 1.5 pounds ) fresh white fish
    • For the batter:
    • 300 ml ( 1 Cup ) Beer
    • 125 g ( 1 Cup ) All Purpose Flour ( Plain Flour )
    • 1 teaspoon Cayenne Pepper
    • 1 teaspoon Salt
    • 1 tablespoon Rapeseed ( Canola ) Oil
    • 8-10 Corn Tortillas
    • Lettuce/Soured Cream/Cheese/Salsas or whatever you choose for the top of the tacos

    Instructions

    1. Whisk the ingredients for the batter together
    2. Heat the oil to 180 C ( 350 F )
    3. Cut the fish into large chunks
    4. Dip each piece into the batter
    5. Fry each piece in the oil for around 5 minutes
    6. While the fish is frying heat the oil in a non stick frying pan and gently fry the tortillas for a minute on each side until lightly browned.
    7. Serve the fish in the tortillas with the toppings of your choice
    © Dan Toombs

    Guacamole Recipe

    August 4, 2020 By Dan

    Homemade Guacamole in a serving bowl next to corn chips.

    If there’s one dish I never get tired of making (and eating), it’s guacamole. It’s simple, quick, fresh and goes with just about everything. Whether I’m throwing together a Mexican-style feast, grilling up meats on the barbecue, or just need something to dip into while sipping a cold beer – guacamole always hits the spot.

    In this post, I’ll show you how to make guacamole the way I like it: traditional, punchy, and full of zing. No weird extras. Just real-deal guac, made in minutes.

    Homemade Guacamole in a serving bowl next to corn chips.

    A Quick Guac History Lesson

    Guacamole goes way back – we’re talking Aztec times in what’s now Mexico. The word itself comes from āhuacamolli, meaning “avocado sauce” in Nahuatl. Simple, right? That’s what makes it so good. The base has always been the same: ripe avocados, lime juice, salt, and maybe a bit of chile and tomato.

    These days you’ll see all sorts of versions – with garlic, with peas (don’t ask me why), even with yoghurt stirred in. But for me, the best guacamole sticks close to the roots. Let the avocado be the star, and build flavour around it.

    [feast_advanced_jump_to]

    What Makes a Great Guacamole?

    There’s guac, and then there’s guac. A great one is all about balance – creamy avocado, tangy lime, a little kick of heat, and a bit of crunch from onion. Here's what I look for:

    • Texture – Slightly chunky, not mashed to oblivion
    • Freshness – Made just before serving for the best flavor and color
    • Zing – Lime juice and salt are key to waking it all up
    • Simplicity – Less is more. You don't need much.

    Ingredients

    Even my guacamole has a couple of ingredients that weren't in the original versions, but it's still quite simple and the avocado is the star ingredient.

    Ingredients for the recipe laid out on a counter top
    • Avocados
    • Tomatoes
    • Onion
    • Jalapeño chilies
    • Lime juice
    • Salt
    • Cilantro
    • garlic

    See recipe card for quantities.

    Instructions

    Use this section for process shots, alternating between the step and image showing the step. Users don't like seeing process shots cluttering up the recipe card, so include your process shots here.

    Spooning the avocado out of the skins.
    1. Step 1: Spoon the avocado out of their skins. Retain the pits if you are not serving the guacamole right after making it.
    Placing the cut up avocado in a pestle and mortar.
    1. Step 2: Chop it all up roughly and put it in a pestle and mortar.
    Pounding the avocado in a pestle and mortar.
    1. Step 3: Pound the avocado to smash it to your preference.
    Adding the chopped onion to the avocado.
    1. Step 4: I usually add the onion second. This way I can get right in there and pound the onion so that the juices get right into the guacamole.
    Adding the diced tomatoes and chillies.
    1. Step 5: Add the diced tomatoes and chillies and keep pounding to incorporate them into the guac.
    Adding lime juice, cilantro and coriander to the guacamole.
    1. Step 6 Add the minced garlic, cilantro (coriander) and lime juice to the guacamole.
    Seasoning with salt to taste and adding the pits to the guacamole to help preserve the color.
    1. Step 7: Season the guacamole with salt to taste. This is a good time to adjust the other flavours too. Add more lime juice for example. If not eating within the next hour or so, push the pit into the guacamole which will help preserve its bright green color.
    Serving the guacamole in a bowl next to corn chips.
    1. Step 8: Enjoy with corn chips or use as a topping for tacos, burritos or steaks. Really... this is good with most things, not just Mexican dishes.

    Variations

    Although I usually keep my guacamole simple, you can do other things to make it a bit different. Here are a few popular ways to do it:

    • Spicy guac – Add more jalapeños or stir in some crushed red pepper.
    • Garlic-lovers’ guac – Add one small minced clove (or roasted garlic for mellow depth).
    • Fruit twist – Stir in chopped mango or pineapple for a tropical vibe.
    • Smoky style – Mix in a bit of finely chopped chipotle in adobo.
    • Crunchy version – Add toasted pepitas (pumpkin seeds) for texture.

    Equipment

    This recipe can be prepared in minutes and all you need is a pestle and mortar.

    If you don't have a pestle and mortar, you could use a blender on pulse mode until you are happy with the consistency.

    Storage

    You can store your leftover guacamole in an airtight container for up to three days. It might discolor some but that does not mean it's off. If it does, stir it and see if you can get some color back.

    Top Tip

    For best results make the guacamole right before serving. Everyone loves to see guacamole being prepared and you can do that at the table for a bit of theater.

    FAQ

    How do you keep guacamole from turning brown?

    Exposure to air is the issue. The lime juice helps, but the real trick is to press plastic wrap directly onto the surface—or even better, eat it straight away. I often place the pits in it if serving later as that can also help keep it fresh looking.

    Can you make guacamole in advance?

    You can make it a couple of hours ahead, but not much more. If you do, save the lime juice until just before serving and cover it tightly.

    Can you freeze guacamole?

    Technically yes, but I don’t recommend it. The texture suffers, and you lose the freshness. It’s such a quick dish—better to make it fresh.

    Related

    Looking for other recipes like this? Try these:

    • Fnished corn chips
      Corn Chips
    • Salsa
      Easy Salsa Recipe
    • Pico de gallo in a serving bowl next to homemade corn chips.
      How to Make Pico de Gallo
    • The finished dish
      Creamy Salsa for Fish

    Recipe

    Homemade Guacamole in a serving bowl next to corn chips.

    Easy Guacamole Recipe

    Yield: 6
    Prep Time: 15 minutes
    Total Time: 15 minutes

    Guacamole is good on so many things. Whether your dipping corn chips or spreading it over a taco or steak, this recipe will get you the flavor you're looking for.

    Ingredients

    • 3 - 4 Avocados
    • 1 small onion, finely chopped
    • 2 medium tomatoes, finely diced
    • 2 Cloves Garlic, minced
    • 1 - 2 jalapeño chilies, finely chopped
    • Juice of 2 Limes
    • 4 tablespoon Cilantro ( Coriander)
    • Salt to taste

    Instructions

    1. Spoon the avocado out of their skins. Retain the pits if you are not serving the guacamole right after making it.
    2. Chop it all up roughly and put it in a pestle and mortar and then pound the avocado to smash it to your preference.
    3. I usually add the onion second. This way I can get right in there and pound the onion so that the juices get right into the guacamole.
    4. Add the diced tomatoes and chilies and keep pounding to incorporate them into the guac.
    5. Add the minced garlic, cilantro (coriander) and lime juice to the guacamole.
    6. Season the guacamole with salt to taste. This is a good time to adjust the other flavours too. Add more lime juice for example. If not eating within the next hour or so, push the pit into the guacamole which will help preserve it's bright green color.
    7. If not eating immediately, press a piece of cling film right on top and then store in an airtight container in the fridge.
    Nutrition Information:
    Yield: 6 Serving Size: 1
    Amount Per Serving: Calories: 260Total Fat: 20gSaturated Fat: 3gTrans Fat: 0gUnsaturated Fat: 16gCholesterol: 0mgSodium: 134mgCarbohydrates: 23gFiber: 11gSugar: 8gProtein: 4g
    © Dan
    Cuisine: Mexican / Category: Mexican


    Easy Tomatillo and Dried Chilli Salsa Recipe

    August 3, 2020 By Dan

    the finished tomatillo salsa


    the finished tomatillo salsa
    Delicious tomatillo salsa recipe


    I love serving an array of salsas with Mexican food and this tomatillo salsa recipe works great with meat or fish.

    I actually used a mixture dried Anch and Guajillo chillies as those are what I had on hand but the tomatillo salsa works very well with any dried chillies. Just remember to cut the tough veins out you will notice inside them and also to soak them for around 15 minutes in boiling water so they are not tough.

    Even though there are quite a lot of dried chillies used this tomatillo salsa is believe it or not that spicy. Dried chillies are not as hot as fresh ones so if you do like the extra heat add some red or green fresh chillies before you blend everything together. 

    If you do require the salsa to take on the green colour of the tomatillos then feel free  to add more tomatillos as the red colour of the dried chilles does take over so the green colour of the tomatillos tends to be lost.


    If you enjoy this recipe try my other Mexican salsas:

    Restaurant Style Salsa
    Creamy Salsa for Fish
    Fish Tacos


    pointing out the tough bits of the chilli to remove
    Remove any hard veiny parts in the dried chillies.

    Roasting the dry chillies
    Toast the chillies until fragrant but not smoking.

    soaking the chillies
    Soak the chillies in boiling water

    Add everything to the blender
    Add the chillies, onions and tomatillos to the blender.

    Recipe

    the finished tomatillo salsa

    Easy Tomatillo and Dried Chilli Salsa Recipe

    Yield: 6
    Prep Time: 20 minutes
    Cook Time: 5 minutes
    Total Time: 25 minutes

    Ingredients

    • 4 Dried Ancho Chillies
    • 4 Dried Guajillo Chillies
    • 1 Pound ( 500 g ) Tinned Tomatillos
    • 1 Medium Onion
    • 3 Tbsn White Wine Vinegar
    • Salt

    Instructions

    1. Remove the veins and the hard parts from inside the dried chillies as these can be tough.
    2. Heat the dried chillies over a medium heat in a griddle pan until they are very lightly roasted
    3. Soak the dried chillies in boiling water for around 15 minutes
    4. Add all of the ingredients to a blender and blend until smooth
    © Dan Toombs
    Cuisine: Mexican / Category: Mexican Recipes


    Creamy Salsa for Fish

    August 3, 2020 By Dan

    The finished dish

    My delicious creamy salsa

    finished creamy salsa for fish
    Fish salsa

    I think one of my favourite foods has to be white fresh served with an array of delicious salsas. This creamy salsa recipe is admittedly not very healthy but a little of it goes perfectly with some lovely fresh fish. I like to serve this creamy fish dip with a few other lighter, tomato based salsas so that the calorific mayonnaise  fish salsa can be balanced out with lovely tomato ones. If you do think there are too many calories in this fish dip try using a lighter soured cream as these are available  and also a reduced calorie mayonnaise would help reduce the fat content.

    This  salsa dip  recipe definitely  works better with fish rather than meat I find but you could try it with chicken as this would work better than red meat with this particular salsa.

    This fish taco sauce is actually not very spicy but of course it would be fine to add some fresh chillies or extra hot sauce if you enjoy a really spicy salsa for fish.

    My recipe can also be made ahead of time as it would easily keep in the refridgerator for a few days.

    If you enjoy this recipe try my other similar ones:

    Pork Pasta with Paprika and Garlic
    Portuguese Pork with Paprika and White Wine Sauce
    Easy Salsa Recipe

    adding the chipotle paste to salsa for fish
    Add the chipotle paste.

    adding some hot sauce
    Hot sauce added!

    Recipe

    The finished dish

    Salsa for fish

    Yield: 4
    Prep Time: 10 minutes
    Total Time: 10 minutes

    Ingredients

    • ½ Cup ( 125 ml ) Mayonnaise
    • ½ Cup ( 125 ml ) Soured Cream
    • 4 teaspoon Chipotle Paste
    • 2 Cloves Garlic
    • 2 teaspoon of your favourite hot sauce
    • 1 Tbspn Mexican Oregano and a pinch to use as a garnish
    • Juice of 3 limes
    • 1 teaspoon salt

    Instructions

    1. Mix all of the ingredients together in bowl
    2. Pour int a servivng bowl and garnish with a pinch of Mexican Oregano
    © Dan Toombs

    My delicious fish salsa

    Tacos al Pastor

    August 2, 2020 By Dan

    Tacos al pastor on a serving plate
    Tacos al pastor on a serving plate
    Perfect for the barbecue. Try this tacos al pastor recipe!


    Where I grew up, taco trucks were the place to get satisfy your taco craving. They were parked all over town and I had a few favourites I used to frequent.

    None of that Taco Bell nonsense for me!

    One of the most famous tacos on the menu was tacos al pastor. The crispy pork meat filling was cooking on a huge vertical spit. As it cooked, the chef would shave off the crispy bits and scoop them generously into my tacos.

    I was surprised when I moved to Europe and saw the same cooking technique being done at the takeaways here.

    The thing is, and this isn't known by many, the famous tacos al pastor is actually has Lebanese influences.

    The history of Tacos al pastor...

    The first introduction to this style of cooking was in the 1930s when Lebanese immigrants. If you've ever tried a shawarma, that's what they were making.

    The Mexicans loved shawarmas and adapted the recipe.

    The Lebanese used lamb for their shawarma as pork was a big no no. The Mexican used pork and for some reason unknown also added pineapple.

    The pork version - tacos al pastor - was also marinated in a more Mexican style marinade like you will see in the recipe below.

    To be honest, I never knew that pineapple was such a popular ingredient in tacos al pastor as they didn't use it at the taco trucks I went to.

    In Mexico, however, many street food stalls top the meat with grilled pineapple pieces. I don't do this as I'm not a big fan of the fruit but if it sounds good to you, do it.

    pork joint
    I only used half of this pork joint for this recipe.


    Removing skin from pork
    Remove the skin from the pork. This makes awesome crackling.


    Thinly sliced pork
    Cut the pork into ¾ (1cm) slices.


    Roasting the dry chillies
    Toast the chillies until fragrant but not smoking.


    Blending the marinade
    Blend the chillies with the other marinade ingredients and then add the pepper.


    Marinating the meat
    Marinate the meat for 24 - 48 hours.


    Cutting the center out of a pineapple
    Cut the center out of the pineapple.


    Sticking a wooden skewer into the pineable
    Stick a wooden skewer into the pineapple.


    Skewered meat
    Ready for the barbecue.


    Cooked pork
    You can keep this on the barbecue and shave off the cooked bits for your tacos.
    Tacos al pastor
    Delicious with the salsa of your choice. I use my restaurant style salsa roja.


    Dig in!
    So easy and so good!

    If you like this tacos al pastor recipe, you might like to try some of these too...

    Pork carnitas tacos
    Pico de gallo salsa
    Camping burritos
    Grilled fish tacos
    Shredded beef tacos
    Easy salsa recipe

    Recipe

    tacos al pastor

    Tacos al Pastor

    Yield: 6
    Prep Time: 20 minutes
    Cook Time: 1 hour 30 minutes
    Additional Time: 2 days
    Total Time: 2 days 1 hour 50 minutes

    Ingredients

    • 4 dried guajillo chillies
    • 4 lbs (2 kg) boneless pork shoulder
    • 3 tablespoons achiote paste
    • 5 cloves garlic - crushed
    • 1 tablespoon dried oregano
    • 1 tablespoon cumin
    • 1 tablespoon pepper
    • ¾ cup (175ml) white distilled vinegar
    • 1 cup (250ml) pineapple juice
    • 1 pineapple

    Instructions

    1. Slice the pork shoulder into thin slices as shown above.
    2. Roast the dried chillies until fragrant but not yet smoking. Then blend all the marinade ingredients. Add the black pepper.
    3. Marinate the meat for 24 - 48 hours.
    4. Slice the center out of the pineapple. If you like pineapple, you can barbecue it with the meat and add chunks of roasted pineapple to your tacos al pastor.
    5. pre-heat your oven or barbecue to 400f (200c).
    6. Cook the pork for 1 and a half hours or until it begins to char on the exterior.
    7. Slice the charred bits off and continue cooking the pork, helping yourself to the meat when you want another taco. Season with salt to taste.
    8. Pile high on warmed or fried corn tortillas topped with your salsa of choice and onions to garnish.
    © Dan Toombs
    I hope you enjoy this recipe. If you do try it, please leave a comment. I'd love to hear from you.

    • « Previous Page
    • 1
    • …
    • 11
    • 12
    • 13
    • 14
    • 15
    • …
    • 24
    • Next Page »
    For Those About To Cook

    Welcome To For Those About To Cook

    We're a family-run food blog sharing brand-new recipes every week. From easy weeknight staples to indulgent weekend favorites. We're a team of five: Dan (The Curry Guy), Caroline, Joe, Shannon, and Jennifer, bringing you a wide variety of dishes inspired by Europe, the Mediterranean, the Americas, and more.

    This site focuses on Western-inspired recipes, while Eastern flavors are covered in depth over at greatcurryrecipes.net Between the two, you'll find everything you need to cook up something amazing so don't forget to subscribe!

    Subscribe

    Footer

    Contact Privacy Policy

    Subscribe for weekly updates!

    Subscribe
    ↑ back to top

    Copyright © 2024 For Those About to Cook